Project: Building Custom Shelves into my Desk

I have a small desk next to my main PC desk, and it's in a bit of a state. There's just enough room for two precariously balanced component drawers, and it feels like they're one nudge away from falling down the cable management trough across the back of the desk. There's a bit of working space in front of them, but it always gets covered in small items that I didn't have anywhere better to put.
The desk itself is very cheaply made out of thin chipboard, and I'm probably it's third or fourth owner. So I thought it would be fun to try and upgrade it, semi-permanently, into something that makes better use of the space: a combination of a desk, shelves, and pegboard. Then I should be able to 3D-print a holder for anything that would clutter the desk, and have it hook into the pegboard above it. Right now, the desk area is the result of stuff absent-mindedly piling up over a couple of years. Now that I can look back at what I've used the space for, hopefully I can figure out a much more intentional and convenient way to use it for the same things. If I'm careful and/or lucky, it might even look better too, but I don't want to get ahead of myself.
I haven't really done a woodworking project before, so I'm thinking about making it as simply as possible, preferably without spending too much on new tools. Having some fully custom furniture that's just for my situation and that I can do whatever I want with sounds pretty good, good enough to stomach buying one or two tools and spending a few hours in a freezing garage building it. It would have been nice if I'd come up with this idea in time before winter, but it's too late now.
How to design something in 3D
The only 3D software I've used well enough to remember its keyboard shortcuts is Blender, but I wanted to try something a bit more CAD focused. Not wanting to break my streak of complaining about proprietary lock-in every day for however long, I wanted to see what the open-source tools were like.
I ended up using two tools, OpenSCAD for the full 3D design, and then LibreCAD for making 2D plans for each part that I could print out and take to the garage with me. This probably wasn't efficient, but it was nice to learn both tools and the approaches that fit them. The interfaces for both of these programs were challenging to learn, and definitely not what you'd call user-friendly, but I spend most of my working day in Vim, so I've seen much, much worse.
Since I was going for such a simple design, it was easy enough to figure out what everything should look like and how it fits together in my head. There were only four real parts to make, two of which were identical. Then, getting it sketched out on paper made a good sanity check, before getting it into CAD to get actual dimensions sorted that I could work from in the garage.
Making the 3D Design with OpenSCAD
OpenSCAD was the stranger of the two programs, as the modelling is done through writing code rather than clicking and dragging stuff around with a mouse. This sounds horrible to most of the people I've shown it to, but as a programmer (software engineer? embedded engineer? pythonista? - pick which sounds the most impressive), I actually quite like it. It's all parametric and re-usable, if I change how wide my desk is in one file, all the other parts will sort themselves out to fit it. The definitions of the parts are derived from variables such the desk's dimensions, and simple maths to combine them. For example, I can specify the width of a pegboard section, then say that the width of the shelf the sections hang from is three times that width plus two times the amount of overhang I want it to have on each side.
Below is what the lower of the two shelves looks like in code, I defined a module of the shapes I cut out of the end of the plank to make the tenon shoulder, then subtract that module from each end of the plank. If I want to change how long the tenons extend for, I only need to change the value in one place, and they will all follow it. All the constant names are defined in another file that gets imported.
include <constants.scad>

// The shape to cut out of the end of the plank to make the tenon
module lower_tenon_cut()
{
    fudge = 0.01; // So that the cuts don't perfectly line up with the edges and cause confusion
    // Left cut-out
    translate([-fudge, -fudge, -0.1])
        cube([d_pillar[0] - blind_mortise_remaining + fudge, lower_tenon_shoulder + fudge, 0.2]);
    // Right cut-out
    translate([-fudge, d_pillar[1] - lower_tenon_shoulder, -0.1])
        cube([d_pillar[0] - blind_mortise_remaining + fudge, lower_tenon_shoulder + fudge, 0.2]);
}

module lower_shelf()
{
    difference()
    {
        // The plank of wood
        cube(d_lower_shelf);
        // Minus the cut-out at one end
        lower_tenon_cut();
        // Minus the mirror image of this cut-out at the other end
        translate([d_lower_shelf[0], 0, 0])
            mirror([1, 0, 0])
                lower_tenon_cut();
    }
}

This "don't repeat yourself" style is used across the whole design, I describe what one pegboard hole looks like, and then use a for loop to cut many of them out of the pegboard. Efficient, re-usable, easy to modify, makes a programmer brain happy.
Following the OpenSCAD tutorial on the project website was enough to learn how to make this (admittedly very simple) project, it was very easy to pick up and use. I doubt it would be as easy for someone who isn't used to programming though.
Making 2D Plans with LibreCAD
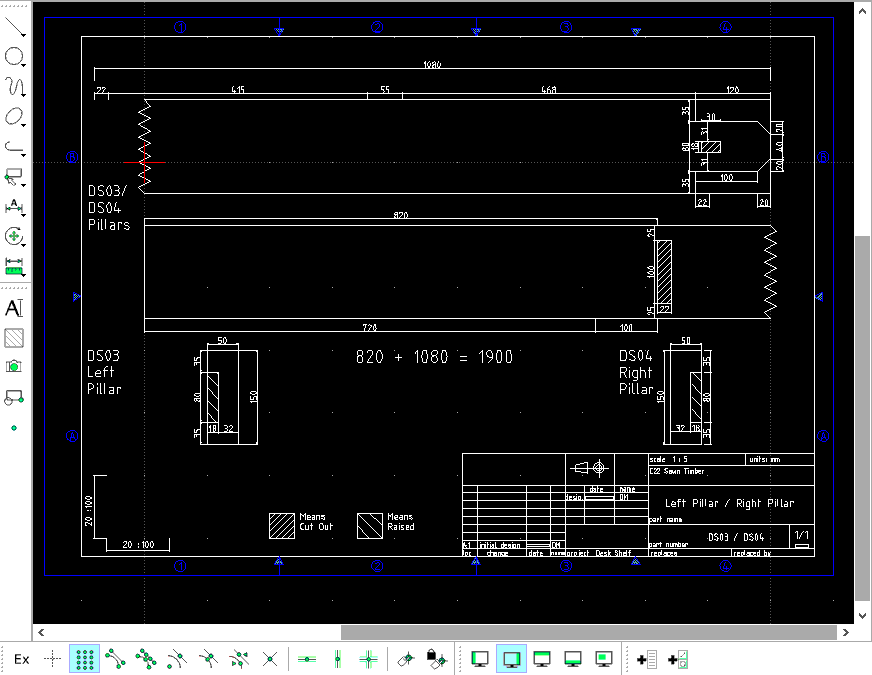
A 3D model is nice to have, I might even get it 3D printed at some point, but it's not much use to me in the aforementioned freezing garage. Some plans on paper to show me where to cut would be much nicer. So I decided to learn LibreCAD to get some nice 2D plans with dimensions written on them in big letters so that hopefully I can measure twice, and only have to buy the wood once. I'd heard about it from watching people on the internet using it to make stuff with LinuxCNC, so it was probably good enough to use with myself as the CNC machine.
Knowing even less about 2D CAD, I just started drawing lines and dimensions and it seemed to work. I don't really have a frame of reference for whether I'd done it properly or not, but since it's output only needed to be read by my future self, it didn't really matter. It took me a while to figure out what layers were, it seems I could use them to import designs from LibreCAD into OpenSCAD if I wanted, but I never tried it. The 2D CAD could have been drawn to scale on paper to have the same effect, but the tool made it easy to add extra dimensions and sanity check things. The output was easy to read, to-scale, and looked vaguely like a real mechanical engineering diagram, so I was happy.
LibreCAD's UI could definitely have been more fun to use, it felt like it took two or three clicks each time I wanted to change tool or select the right bit of the diagram. I got the feeling that it would become a lot nicer to use after spending long enough to remember the keyboard shortcuts, but I was finished before I'd got that far. The UI reminded me of IPE, an open source editor for diagrams for LaTeX, which also felt like having to walk to and from a toolbox each time you switched from the select tool to the move tool, until I'd learned the shortcuts. This might be a trend for UIs made by open-source teams designing to suit their own preferences, rather than to look good in a sales demo.
The Actual Shelf Design
Tools are cool and all, but I'm realising now I haven't said anything about what the shelf will look like. I went with a design that is as simple as I could make it, that's easy to take apart for transport or if I want to modify it in future.
What this looks like is a pillar from the floor extending each of the back legs of the desk upwards to around my shoulder height, with a shelf just above the desk between the pillars for the component drawers to sit on, a shelf at the top of the pillars, and a set of three pegboards attached to the top shelf hanging downwards. The lower shelf is attached to the pillars through blind mortises in them, horizontally against the grain. The top shelf is connected using tusk tenons coming from the top of the pillars, that go through mortises in the top shelf, and then the shelf is held in place using wedges that go through the tusk tenons. The pillars will be attached to the desk legs using screws, since I couldn't think of anything easier to dissasemble that wouldn't risk breaking its thin chipboard legs.
_|_______|_ -- Top shelf
###########
########### -- Pegboard
###########
 |       |
 |[ ] [ ]| -- Component drawers
 |[ ] [ ]|
 |-------| -- Bottom shelf
 |       |
 ||-----|| -- Table top
 ||     ||
 ||     ||
So four parts, plus the screws, pre-made pegboards, and wedges to hold the top shelf in place. I didn't want to go too crazy with the design for the first woodworking project I've done, especially since I'll have to look at it every day. Some of my first design ideas on paper had tens of parts, before I realised I should probably calm down a bit. I shouldn't need any power tools at all to make this, if I can stomach using a hand drill, although at the time of writing this I've already failed to stop myself from buying more power tools that will *probably* come in useful in the future.
While it would probably be easier to just glue and screw everything together, there's something satisfying about making all the parts to fit together dry like building blocks, so that I can easily take them apart again if I want. Plus someone on a woodworking forum said that this style of joinery is cool, and just screwing everything together was cringe, so you can't really argue with that. More objectively, I'll learn more new skills by making things a bit harder than they needed to be, which is great when you don't have any time pressure. It should make it more satisfying to make too, which is important for a hobby project.
Starting Construction
Having stared at the 3D model and 2D diagrams for long enough to be confident that it might work, I bought the wood for it and practised each type of joint on the offcuts. I got 4.2 m of 44x144 mm for the pillars and 4.2 m of 20x144 mm for the shelves, both planed-all-round redwood.
Before buying the wood, I had incorrectly assumed that the sign saying that the wood was 150 mm wide, meant that it was 150 mm wide. What that actually seems to have meant was that it used to be 150 mm wide, before someone took 3 mm off of each side. I much prefer the look of the planed-all-round wood, but it would have saved me some confusion to label it with its real-life dimensions. Thankfully my plans were simple enough that I could work out what the real measurements I needed were using my phone calculator in the garage, and pencil them on the 2D plans I'd printed out.
I had started practising the joints using scrap wood from pallets before, but found it much more difficult, as the pallet wood had been left out in the rain, which made it hard for the chisel to make proper cuts.
Cutting actual straight lines in all three dimensions with the handsaw took a bit of getting used to, but if I don't get it perfect in the final build things will still work fine, there'll just be visible gaps. Cutting mortises against the grain for the lower shelf with just a hammer and chisel wasn't as hard as I thought it would be, it just took a while to do. In the shelf's current state of not existing in real life, it's hard to say if the screws in the top shelf will be enough to support the pegboards when they're holding weight. Since the shelves should be easy to dismantle, it shouldn't be a problem to add a copy of the lower shelf in line with the bottom of the pegboards to give them another place to screw in to and share the weight, if it turns out to be necessary.
Finishing Construction
Now I've finished building the shelf, I can see that I used the classic woodworking technique of making everything 10 times stronger than it needed to be. The pegboards are attached strongly enough with just the screws to hold all sorts of heavy woodworking tools, so the bits and bobs from my desk in my flat will be no issue. I was worried the ~20 mm thick lower shelf would bow under the weight of the component drawers, but now I've made it, I'm pretty sure it could support me standing on it without issue.
Everything went together first time, which was partly from luck and partly from spending so long thinking about making the design simpler instead of charging into it. While it feels slightly bad to have written down the first version of the design in August and finished making it in January, I acheived my goal of only having to buy the wood once.
Having said that, I did basically ignore the design of how to attach the shelf pillars to the desk itself until the last minute. In the end I didn't trust the ancient centimetre-wide chipboard at all, and I cut out some of the leftover wood from the pice the shelves were made from into the shape of the desk's legs. I then sandwiched the desk's legs between the pillars on the outside and these new pieces on the inside, and used bolts and large washers on the outside and tee nuts on the inside to clamp the sandwich together. It was in-keeping with the over-built theme I had going on, but it actually looks quite clean, and could probably survive a direct hit from a motorbike. I learned a fun fact about my forstner bits, which is that if you've already drilled a large hole that you want to counter-bore, the bit will walk all over the place and chew everything up. I bought a hacksaw and file set for cutting the bolts down so the excess wouldn't stick out, but they turned out to be the right size down to the millimetre out of the box, which was nice.
Other Stuff
While I was around half-way through building the shelf, I heard about CADQuery and Build123D, which are similar to the OpenSCAD style of CAD tools, but using Python rather than a custom language. I had a go with both, and preferred CADQuery's API, despite the Build123D being a fork of it designed to improve exactly that. I had a go at re-making the shelf's design using a combination of both, since Build123D had better facilities for exporting designs, and they relatively easy to mix in the same file. I really liked using them, and found that it would be a way to have the 2D design and 3D design in the same place. While it took a while to figure out the low-level incantations to get nice SVG and DXF output lined up on a page, it did eventually work, and provided nice scaled diagrams. For a new project, this would save me having to do the design in two tools, one for 3D and one for 2D. It's also nice and parametric and supports a good number of import and export formats. It was easy enough to make my own function to draw aligned dimensions for example, which I could re-use many times for the 2D plans. Below is the definition of the upper shelf in CADQuery:
u_shelf = (
    cq.Workplane("XY") # Start on a 2D plane
    .box(upper_shelf_width / 2, shelf_depth, shelf_height, centered=False)
    .faces(">Z")
    .workplane()
    .move(desk_width / 2 + pillar_width - chisel_width, pillar_shoulder)
    .rect(chisel_width, shelf_depth - 2 * pillar_shoulder, centered=False)
    .cutThruAll() # Cut one mortise
    .faces(">Z")
    .mirrorY() # Mirror the part, since it's symmetrical
    .extrude(-shelf_height) # Bring the 2D design into 3D
)
Thoughts now it's the Future
For the first thing I've ever built out of wood, I think it looks really nice, and it's already made the whole area it's in cleaner by absorbing all the bits and bobs that I didn't have anywhere better to put. I think going for an extremely simple design was key in getting it made without anything going wrong, or me just giving up and moving on to another project. I even managed to stick to my arbitrary rule of making it using only hand tools, and I stuck to joinery techniques instead of fastenings, for the part above the desk that's visible at least. For the next woodworking thing I do, I think I'll be a bit more pragmatic about when I use power tools though.
Having made this shelf successfully, with a tasteful amount of effort (and an unfortunate amount of time), I feel more confident about making more custom furniture around my flat, and I'm already coming up with ideas. One more project that I'd been thinking about for ages has finally been finished, and won the war against feature-creep in the process. While it is fun to think about how I'd integrate all sorts from hanging shelves to planters to VESA mounts, it was definitely the right call to hold myself back and say four parts (which later became six) is enough for my first project of the kind. A shelf of 20 parts which would become 30 would have been much less likely to make it, especially spending most of its building time out of sight and mind in the garage.
Now I've done my ~10k hours and officially mastered mechanical engineering, furniture design, and CAD, it should be much easier for me to justify buying a CNC machine, which was the real plan all along.
